I never thought that I'll be spending much time Gardening, but nowadays, I am. I now have a healthy assortment of succulents and cacti and just made rock art for the first time:
Tools used: flat rock/stones, acrylic paint, brush, Elmer's glue and water. I used glue to make DIY Mod Podge. It's the first time I ever heard of Mod Podge and to those as clueless as I am, Mod Podge acts as a paint sealer. I don't know if my Mod Podge is effective, I'll just trust that it is (FYI, the recipe that I used is 1 part glue to 3 parts water).
Whenever I do something for the first time, I'm always torn if I need to buy stuff like those professionals do. In this case, I debated if I should buy (1) the classic Mod Podge, (2) Uni Posca Paint Markers and (3) Gesso Primer -- just because they seem like the best materials to make your rock art pop, according to YouTube tutorials and blogs.
In the end I'm too practical. Artists hoard stuff for a reason-- different arts need different materials! And I had no idea if I'll enjoy creating rock art at all. So I settled for some random acrylic paints I have at home and glue. No primer. I'll just buy those stuff in case I like to create more rock art in the future.
BTW, I'm still happy with the results.
My succulents and rocks look happy!
Disclaimer: I just copied the rock designs from others via Google. So I will not be claiming that they are original designs.
Showing posts with label DIY. Show all posts
Sunday, March 10, 2019
Saturday, January 19, 2019
DIY: Upcycled Tin Cans
Just a commercial break from all those comics, illustrations and hand lettering stuff I've been doing. I'm currently in a non-creative mood OR maybe I'm IN a creative mood; just not with regards to all those stuff I've been doing for years.
So I just jumped into the washi tape bandwagon. I know, washi tapes have been here for years so I'm late into the game. But one of my New Year's resolution is to upcycle more so I got inspired to "prettify" those tin cans I have laying around my room.
Disclaimer: blurry, at the same time, overly-filtered camera photos ahead.
Just bought these washi tapes from Miniso at Php118 (around USD 2.25) per ten tapes. As this is the first time I've bought washi tapes, I have no idea if the quality is good or if it is a good buy. But hey, these are cute tapes so why not?
And I just looped those washi tapes around the cans.
TADA! The finished products:
I think I could have made the execution neater but I have to admit, I love all the colors!
I have a lot of little things in my room so at least the mess looks a bit pretty.
I hope everybody is having a good 2019 so far <3
BTW, if you're interested, here is a link to my old, simple DIY posts: https://www.snippetsincolors.com/search/label/DIY
So I just jumped into the washi tape bandwagon. I know, washi tapes have been here for years so I'm late into the game. But one of my New Year's resolution is to upcycle more so I got inspired to "prettify" those tin cans I have laying around my room.
Disclaimer: blurry, at the same time, overly-filtered camera photos ahead.
![]() |
| This can is cute but (1) this is Christmas-inspired and it isn't Christmas anymore and (2) I got tired of seeing "Swissmiss" in the cans-- I mean, I DO have three of this! |
And I just looped those washi tapes around the cans.
TADA! The finished products:
I think I could have made the execution neater but I have to admit, I love all the colors!
I have a lot of little things in my room so at least the mess looks a bit pretty.
I hope everybody is having a good 2019 so far <3
BTW, if you're interested, here is a link to my old, simple DIY posts: https://www.snippetsincolors.com/search/label/DIY
Wednesday, January 25, 2017
Cat Face Bookmarks
I planned on making bookmarks with all of my characters but alas, only these two are decent.
The bookmarks were inspired by stained glass window effects I learned on an art class when I was in elementary. It's made of construction paper + some orange ribbons. My 12-year-old self would have been proud.
![]() |
| This "art" is created by a brush pen and watercolor pencils. And yes, it is filtered oddly... |
Wednesday, June 18, 2014
DIY: Clay Pot Decoration
I was just googling clay pot designs and darn, there are just so many perfect ones out there! Of course, that doesn't stop me. I will post this anyway.
Finished Product:
Materials:
Clay Pot
Acrylic Paint
Brush(es)
Palette
Pencil
Newspaper (to protect working surface)
Toothpick (optional, for drawing fine lines)
Steps:
1. Place the clay pot and paint atop a newspaper to protect your working surface. Design your pot using a pencil.
2. Start painting. I used toothpicks and the smallest brush for fine lines. Otherwise, I mainly used the bigger brush(es).
3. Let the paint dry.
Easy right? I have to admit, I selected the wrong clay pot. I think it was originally green? But I did paint another pot which I like better...
Enjoy!
....Off to paint another one...
Finished Product:
Materials:
Clay Pot
Acrylic Paint
Brush(es)
Palette
Pencil
Newspaper (to protect working surface)
Toothpick (optional, for drawing fine lines)
Steps:
1. Place the clay pot and paint atop a newspaper to protect your working surface. Design your pot using a pencil.
| Just use your imagination when doodling :) |
2. Start painting. I used toothpicks and the smallest brush for fine lines. Otherwise, I mainly used the bigger brush(es).
| Black lines were made using a toothpick |
3. Let the paint dry.
Easy right? I have to admit, I selected the wrong clay pot. I think it was originally green? But I did paint another pot which I like better...
| Another sample design |
Enjoy!
....Off to paint another one...
Wednesday, January 1, 2014
DIY: Bum Bag Facelift
Happy New Year!
So I haven't posted a DIY for ages. And since today is a very special day, I decided to do a very simple DIY that I've been meaning to do for over a year now.
Background/Problem: I have this bum bag I got for free at a gas station. Of course, it has the name of the gas station all over it and gee, I just don't feel comfortable walking around with it on my waist.
Solution: Pass time and give the bum bag a facelift.
Materials:
Bum Bag (Or any old bag you want to modify/experiment with)
Acrylic Paint
Brushes
Palette
Water (I just used it to clean the brushes in between painting)
Steps:
1. Remove the unwanted design in the bag by painting over it. Since my bag is black, I just used the black acrylic paint to make it a black canvas. Let the paint dry.
2. Design the bag. Feel free to be creative! One tip: let the paint dry in between takes. You don't want the colors to mix up!
So I haven't posted a DIY for ages. And since today is a very special day, I decided to do a very simple DIY that I've been meaning to do for over a year now.
Background/Problem: I have this bum bag I got for free at a gas station. Of course, it has the name of the gas station all over it and gee, I just don't feel comfortable walking around with it on my waist.
Solution: Pass time and give the bum bag a facelift.
Materials:
Bum Bag (Or any old bag you want to modify/experiment with)
Acrylic Paint
Brushes
Palette
Water (I just used it to clean the brushes in between painting)
| Materials |
Steps:
1. Remove the unwanted design in the bag by painting over it. Since my bag is black, I just used the black acrylic paint to make it a black canvas. Let the paint dry.
| Bag without the logos on it. Finally! |
2. Design the bag. Feel free to be creative! One tip: let the paint dry in between takes. You don't want the colors to mix up!
| Finished Product |
The best thing about this is if you messed up, you could just repaint and restart. Easy, right?
My Design Inspiration: Motivational books. In this case, I believe it's a John Maxwell book. I believe people should go after their dreams. If you want to be a candy chef, go for it. If you want to be a nun or a priest, go for it. If you want to be a bum, go for it (I wouldn't recommend this though!). So if my bag says it wants to be a Prada bag, who knows, someday it will probably will. :P
Wednesday, April 17, 2013
Sewing
This year I am adamant on learning how to properly sew clothing. Let's see how it goes but a word of advice:
Don't be a cheapskate like me and try to learn sewing using a handheld sewing machine. Or if you're absolutely sure it will work for you, invest on at least a branded handheld one. Thank goodness it's just Php150 (around USD4), bought from Divisoria!
Instead, just buy a basic sewing machine. I just bought mine and I'm still learning how to use it properly *excited*.
Here's my first learning project. A scrunchy. :P
Do I need to write a tutorial for this? Probably not as I just made it along as I go. I cut a 12"x 3" piece of cloth lying around the house. I also used a 4" garter. Then I just sew the edges together. Finished!
Don't be a cheapskate like me and try to learn sewing using a handheld sewing machine. Or if you're absolutely sure it will work for you, invest on at least a branded handheld one. Thank goodness it's just Php150 (around USD4), bought from Divisoria!
Instead, just buy a basic sewing machine. I just bought mine and I'm still learning how to use it properly *excited*.
Here's my first learning project. A scrunchy. :P
Do I need to write a tutorial for this? Probably not as I just made it along as I go. I cut a 12"x 3" piece of cloth lying around the house. I also used a 4" garter. Then I just sew the edges together. Finished!
Labels:
Arts and Crafts,
Brother LS-2160,
DIY,
Handheld Sewing Machine,
Scrunchy,
Sewing
Sunday, March 17, 2013
DIY: Handmade Envelopes
Along with my journal covers,
one DIY project I do on a semi-regular basis are envelopes. While I
hardly use postal mail anymore, I find them useful when giving cash
gifts to people. Definitely better and more personalized than a regular
white, blank envelope.
What you’ll need:
For the envelope pattern:
Old Cardboard
Ruler
Pencil
Scissors
For the envelope:
Photos/Pictures -- I always use big, glossy calendar photographs
Pencil
Scissors
Glue
Creating the Envelope Pattern:
The
envelope pattern will be your guideline in making your envelope. This
is mostly a one-time procedure since the pattern could be used over and
over again.
While
you could design your own pattern(horizontal, vertical, big, small,
rounded flap, etc.), I’ll give you mine for illustration. Make sure that the pattern has extra allowance for folding and gluing
the panels together wherever necessary. For the pattern below, all 0.5'' measurements are panels where glue will be placed.
![]() |
| Front Piece |
![]() |
| Back Piece. The cut for the gluing panels are slightly inclined at the top. |
Measure and cut the pattern out from the cardboard.
Creating the Envelope:
1. Trace the pattern over your photo/picture. Make sure to trace over the
details that you would want visible on the back and front panels of your
envelope.
2. Cut out the envelope pieces
3. Fold and glue the pieces together
| Folded! |
Done!
| Finished product |
Now I have plenty of envelopes--
I hardly think envelopes warrant making a post over but I made a bunch just recently and thought “oh well, will post”.
Saturday, January 5, 2013
DIY: Shoe Bag
[First DIY of the year!]
My trusty (old) shoe bag has been getting so much mileage that I finally decided to make my own version by using cloth(s) I have been saving for something. One of the easiest and functional DIY I have ever made.
Materials:
Two pieces of 15"x12" (length x width) rectangular fabrics
Thin ribbon a couple of feet long
Scissors
Needle and Thread
Ruler or Tape Measure
Fabric Marker
Procedure:
1. Mark where you have to sew. I placed lines 1/4" from the right, left and bottom sides and 1/4" + an additional 3/4" at the top. To rephrase, the top portion has two lines with a summation of 1" allowance.
2. Sew the top part first by folding down the cloth on the first and then the second line and then sew along the bottom of the fold. Make sure that the ribbon will fit in! Normally, I would be cleaner in sewing stuff but since the fabrics doesn't fray easily (or due to laziness), I just decided to sew the bottom and side parts directly together. For the side part, make sure that you don't sew over the ribbon hole at the top.
Note: Sew on the wrong side of the fabrics! We will be turning the cloth right side out later.
3. Push ribbon in the top flap and loop it around twice. I normally do this by placing a safety pin on the ribbon edge and sliding it through the hole.
4. Tie ribbon edges together.
5. Turn the bag right side out. See the effect of looping the ribbon twice?
Finished! As the cloths I used are mismatched, here's a view of the other side--
P.S. This has obviously been handsewn and projects like this always makes me want to buy a sewing machine. I rarely do projects like this though and getting a machine seems a little bit wasteful... oh well, hopefully in the future.
My trusty (old) shoe bag has been getting so much mileage that I finally decided to make my own version by using cloth(s) I have been saving for something. One of the easiest and functional DIY I have ever made.
| My shoe bag -- the end product |
Materials:
Two pieces of 15"x12" (length x width) rectangular fabrics
Thin ribbon a couple of feet long
Scissors
Needle and Thread
Ruler or Tape Measure
Fabric Marker
| Materials |
Procedure:
1. Mark where you have to sew. I placed lines 1/4" from the right, left and bottom sides and 1/4" + an additional 3/4" at the top. To rephrase, the top portion has two lines with a summation of 1" allowance.
| Top and side flap markings |
2. Sew the top part first by folding down the cloth on the first and then the second line and then sew along the bottom of the fold. Make sure that the ribbon will fit in! Normally, I would be cleaner in sewing stuff but since the fabrics doesn't fray easily (or due to laziness), I just decided to sew the bottom and side parts directly together. For the side part, make sure that you don't sew over the ribbon hole at the top.
Note: Sew on the wrong side of the fabrics! We will be turning the cloth right side out later.
| View of finished side and top flap. |
3. Push ribbon in the top flap and loop it around twice. I normally do this by placing a safety pin on the ribbon edge and sliding it through the hole.
4. Tie ribbon edges together.
5. Turn the bag right side out. See the effect of looping the ribbon twice?
| Bag top view |
Finished! As the cloths I used are mismatched, here's a view of the other side--
| Shoe Bag's Other Side |
P.S. This has obviously been handsewn and projects like this always makes me want to buy a sewing machine. I rarely do projects like this though and getting a machine seems a little bit wasteful... oh well, hopefully in the future.
Wednesday, October 10, 2012
DIY: Handmade Paper
One of my to-do's is handmade paper. I bought this handmade paper making kit from Papemelroti years ago and used it once to make a total of four sheets of paper. That's right, four sheets! Still, I decided to give it another go, hopefully making a whole bunch this time.
Here is a simplified step-by-step guide based from the kit instructions (refer here for more detailed instruction). I love how Papemelroti consciously promotes not only recycling materials but earth-friendly activities, too!
Things needed:
*bunch of scratch/used paper
*water
*starch
*blender
*basin
*newspaper
*sponge
*Deckle (part of kit)
*Mold (part of kit)
1. Tear/cut used paper into 1/2 inch squares.
2. Use a blender to mix the paper with water. I used the proportion: 2.5 cups of paper = 3.5 cups of water.
3. Place mixed paper and water into the basin. Add 2 tablespoon starch.
4. Place the deckle on top of the mold (wires should be in between) and scoop up paper. Shake a bit to get rid of excess water.
5. Remove Deckle and place Mold on newspaper with the used paper between the mold and newspaper. Using a sponge, soak up remaining excess water.
6. Detach Deckle from the paper. Design *optional*.
7. Leave the paper for 0.5-1 day or until dry. By then it should detach easily from the newspaper.
Relatively easy, right?
Verdict: Fun to do and very informative but if you desperately need papers, better just buy a ream from the store! I think I cut out around 50 used-up paper to make 17 sheets of paper. Plus I spent hours doing this stuff!
Here is a simplified step-by-step guide based from the kit instructions (refer here for more detailed instruction). I love how Papemelroti consciously promotes not only recycling materials but earth-friendly activities, too!
Things needed:
*bunch of scratch/used paper
*water
*starch
*blender
*basin
*newspaper
*sponge
*Deckle (part of kit)
*Mold (part of kit)
1. Tear/cut used paper into 1/2 inch squares.
2. Use a blender to mix the paper with water. I used the proportion: 2.5 cups of paper = 3.5 cups of water.
3. Place mixed paper and water into the basin. Add 2 tablespoon starch.
| (Kinda looks like food...) |
4. Place the deckle on top of the mold (wires should be in between) and scoop up paper. Shake a bit to get rid of excess water.
5. Remove Deckle and place Mold on newspaper with the used paper between the mold and newspaper. Using a sponge, soak up remaining excess water.
6. Detach Deckle from the paper. Design *optional*.
| Design # 1: Decided to press some dried leaves |
| Design # 2: Paper with dried flower petals |
7. Leave the paper for 0.5-1 day or until dry. By then it should detach easily from the newspaper.
| And voila! |
Relatively easy, right?
Verdict: Fun to do and very informative but if you desperately need papers, better just buy a ream from the store! I think I cut out around 50 used-up paper to make 17 sheets of paper. Plus I spent hours doing this stuff!
Labels:
Arts and Crafts,
DIY,
Handmade Paper,
Papemelroti,
Recycling
Sunday, February 26, 2012
DIY: Customized Journal Cover
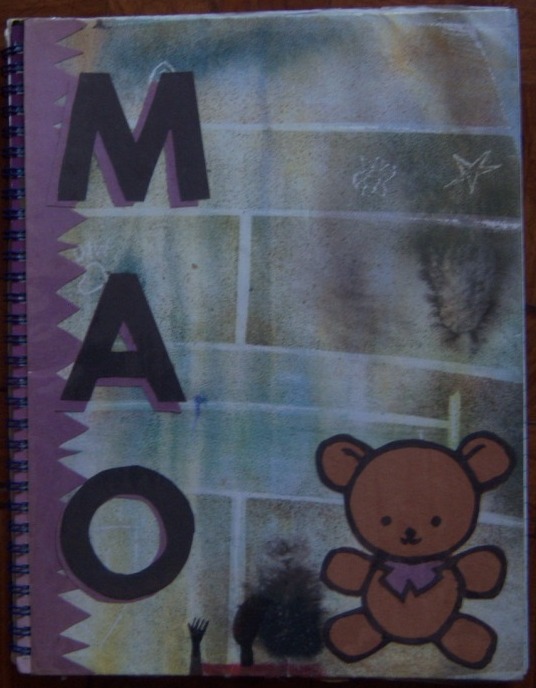
No cartoons for today but I do have a DIY designed for bored people... a customized journal cover! I've been doing this for years so I might as well post it.
Here are the materials:
1. A boring looking notebook
2: Art materials
3. Some creativity. Do not stick with whatever I've written here. If you want beads on your journal, then go for it! If you want cloth-like covers then do it! Journals are personal things and that includes designing it.
Things to look out for:
1. Colors!
2. Textures/Patterns
3. Photos
Some Samples. I always place my nickname in my journals:
Here are the materials:
1. A boring looking notebook
Doesn't matter if it's tattered or whatever. It will be covered sooner or later anyway.
You will need LOTS of papers. Some samples shown above are old magazines and art papers. You will need scissors for cutting things, glue and tape for pasting things, pencil/pens/colored pencils for doodling whatever design you want and plastic cover to cover your journal after you have finished designing it.
3. Some creativity. Do not stick with whatever I've written here. If you want beads on your journal, then go for it! If you want cloth-like covers then do it! Journals are personal things and that includes designing it.
Things to look out for:
1. Colors!
Look for colors that represent you. I like these pink and purple ones. They look so happy and will look great as journal covers!
Backgrounds need not be plain. Go for crazy patterns!
3. Photos
I've been seeing lots of cool photographs nowadays. Why not use them as journal covers? I love this picture from a Hush Puppies ad, if I remember correctly.
Some Samples. I always place my nickname in my journals:
Even the letterings are cut out from magazines.
Journal with photograph.
Journal for little kids.
Keeping it simple.
Subscribe to:
Posts (Atom)