Saturday, January 12, 2013
Saturday, January 5, 2013
DIY: Shoe Bag
[First DIY of the year!]
My trusty (old) shoe bag has been getting so much mileage that I finally decided to make my own version by using cloth(s) I have been saving for something. One of the easiest and functional DIY I have ever made.
Materials:
Two pieces of 15"x12" (length x width) rectangular fabrics
Thin ribbon a couple of feet long
Scissors
Needle and Thread
Ruler or Tape Measure
Fabric Marker
Procedure:
1. Mark where you have to sew. I placed lines 1/4" from the right, left and bottom sides and 1/4" + an additional 3/4" at the top. To rephrase, the top portion has two lines with a summation of 1" allowance.
2. Sew the top part first by folding down the cloth on the first and then the second line and then sew along the bottom of the fold. Make sure that the ribbon will fit in! Normally, I would be cleaner in sewing stuff but since the fabrics doesn't fray easily (or due to laziness), I just decided to sew the bottom and side parts directly together. For the side part, make sure that you don't sew over the ribbon hole at the top.
Note: Sew on the wrong side of the fabrics! We will be turning the cloth right side out later.
3. Push ribbon in the top flap and loop it around twice. I normally do this by placing a safety pin on the ribbon edge and sliding it through the hole.
4. Tie ribbon edges together.
5. Turn the bag right side out. See the effect of looping the ribbon twice?
Finished! As the cloths I used are mismatched, here's a view of the other side--
P.S. This has obviously been handsewn and projects like this always makes me want to buy a sewing machine. I rarely do projects like this though and getting a machine seems a little bit wasteful... oh well, hopefully in the future.
My trusty (old) shoe bag has been getting so much mileage that I finally decided to make my own version by using cloth(s) I have been saving for something. One of the easiest and functional DIY I have ever made.
| My shoe bag -- the end product |
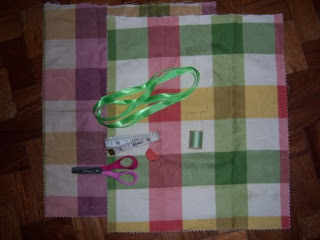
Materials:
Two pieces of 15"x12" (length x width) rectangular fabrics
Thin ribbon a couple of feet long
Scissors
Needle and Thread
Ruler or Tape Measure
Fabric Marker
| Materials |
Procedure:
1. Mark where you have to sew. I placed lines 1/4" from the right, left and bottom sides and 1/4" + an additional 3/4" at the top. To rephrase, the top portion has two lines with a summation of 1" allowance.
| Top and side flap markings |
2. Sew the top part first by folding down the cloth on the first and then the second line and then sew along the bottom of the fold. Make sure that the ribbon will fit in! Normally, I would be cleaner in sewing stuff but since the fabrics doesn't fray easily (or due to laziness), I just decided to sew the bottom and side parts directly together. For the side part, make sure that you don't sew over the ribbon hole at the top.
Note: Sew on the wrong side of the fabrics! We will be turning the cloth right side out later.
| View of finished side and top flap. |
3. Push ribbon in the top flap and loop it around twice. I normally do this by placing a safety pin on the ribbon edge and sliding it through the hole.
4. Tie ribbon edges together.
5. Turn the bag right side out. See the effect of looping the ribbon twice?
| Bag top view |
Finished! As the cloths I used are mismatched, here's a view of the other side--
| Shoe Bag's Other Side |
P.S. This has obviously been handsewn and projects like this always makes me want to buy a sewing machine. I rarely do projects like this though and getting a machine seems a little bit wasteful... oh well, hopefully in the future.
Tuesday, January 1, 2013
Photobooth
Labels:
Holiday Cartoon,
Itim na Dwende,
Kapre,
Manananggal,
Mummy,
Puting Dwende,
Tikbalang
Saturday, December 29, 2012
040: Exchange Gift
I made this a while back to post for Christmas. Unfortunately, I misplaced it and was incredibly disappointed! I just got it back recently and decided to post it anyway. Everyday is a Christmas Day, right?
Labels:
Comic Strip,
Filipino Myth,
Holiday Cartoon,
Itim na Dwende,
Tikbalang
Saturday, December 22, 2012
Give and Receive
I created these comic strips in two different perspectives hoping it would have more depth-- a "2-D" comics if you will. They share some common frames and I wished I could have combined it into just one strip somehow. But that might be too confusing even for me.
Strip # 1:
Strip # 2:
While these strips could have been better (e.g. have good colors and clearer computerized font), I think it is a fitting post so near Christmas. Happy Holidays to all!
Friday, December 14, 2012
Friday, December 7, 2012
038: The Wish
I made this while thinking how that one big thing we're trying to achieve may not be our ultimate dream at all. This is the irony in Kat's story -- how she has all the fame, money and prestige yet what she really wants is something a little more simple. It is also ironic that this "something simple" could be done by just about anyone but her!
So what I want to impart is this: do what you want to do whether it's simple or hard and know that nothing is impossible in life! I know for a fact that Kat will be able to play hopscotch, she just have to figure out a way how.
For reference cartoons, click here:
Kat's Fashion Designs
Kat's Knick Knacks
Kat's Paper Bag Designs
Subscribe to:
Posts (Atom)